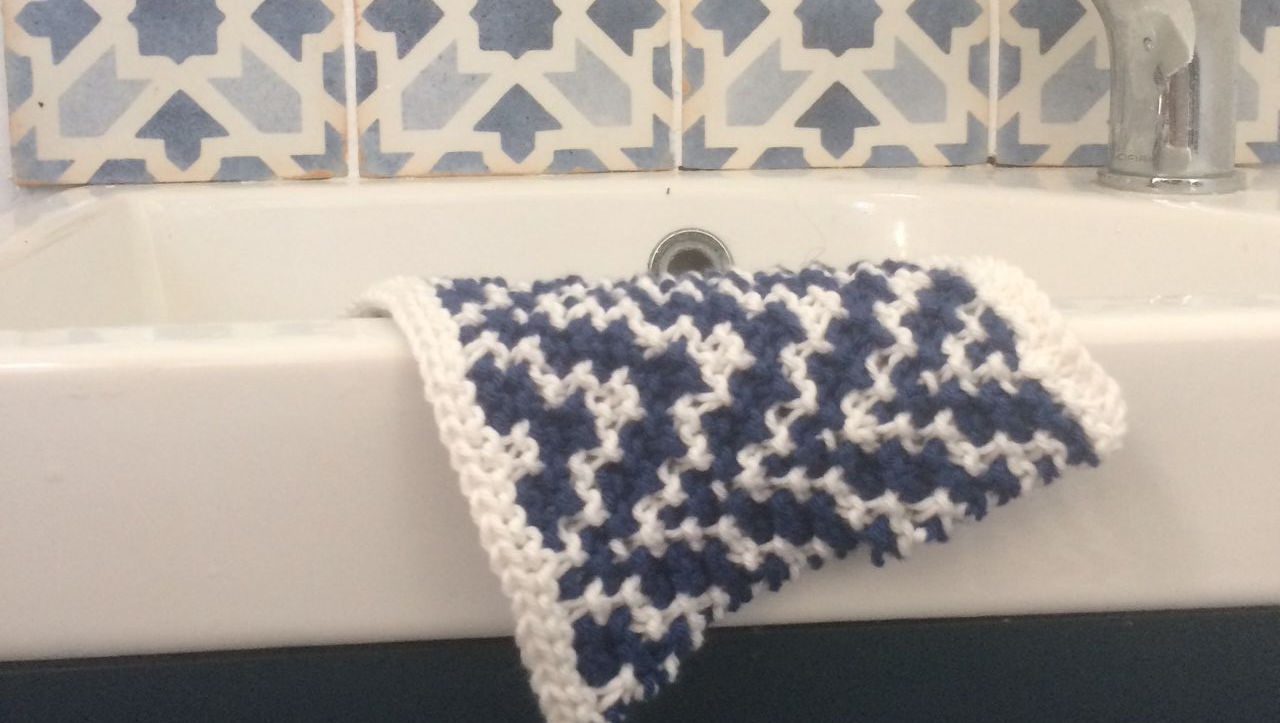
Mosaic Waves Practise Swatch
The waves pattern is an 11 stitch pattern repeat with 1 selvedge stitch at each edge of the work.
You can use the waves pattern as a border to your work , example at the bottom edge of a cardigan or to edge a blanket. Simply cast on ( or pick up) in multiples of 11 plus the 2 selvedge stitches.

Instructions
Yarn A =Whte , Yarn B = Blue
The waves pattern is an 11 stitch pattern repeat with 1 selvedge stitch at each edge of the work.
You can use the waves pattern as a border to your work , example at the bottom edge of a cardigan or to edge a blanket. Simply cast on ( or pick up) in multiples of 11 plus the 2 selvedge stitches.
For this practise swatch we will cast on 35 stitches using 4mm needles and Yarn A. The pattern will be repeated 3 times along the row.
IMPORTANT - Slip the stitches purlwise and strand the yarn at the back of the work.
Each colour is worked for 2 rows.
- Row 1: In Yarn A, Knit to end.
- Row 2 and all WS rows: Work all knit, slipping all the stitches that had been slipped in the previous row.
- Row 3: In Yarn B, K1, *(K3, S1) twice, K3; rep from * to last st, K1.
- Row 5: In Yarn A, K1, *K1, S2, K2, S1, K2, S2, K1; rep from * to last st, K1.
- Row 7: In Yarn B, K1, *S1, K3, S1, K1, S1, K3, S1; rep from * to last st, K1,
- Row 9: In Yarn A, K1, *K2, S2, K3, S2, K2; rep from * to last st, K1.
- Row 11: In Yarn B, K1, *K1, S1, (K3, S1) twice, K1; rep from * to last st, K1.
- Row 13: In Yarn A, K1, *S1, K3, S1, K1, S1, K3, S1; rep from * to last st, K1.
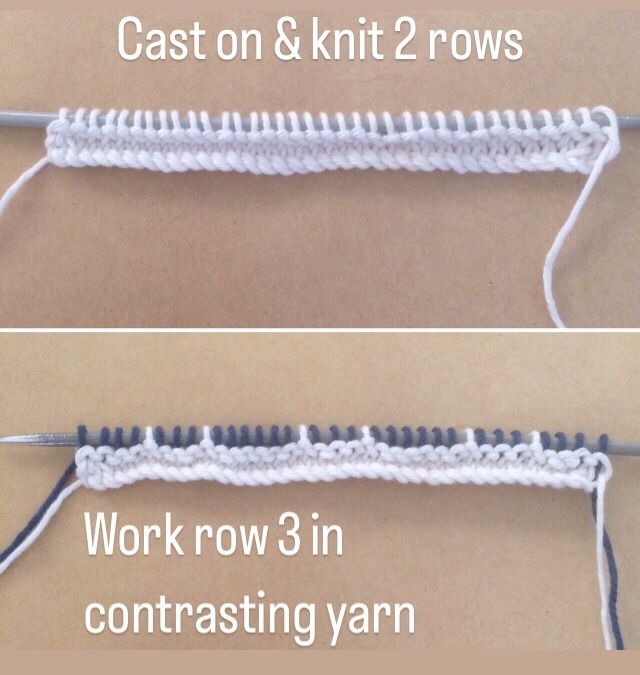
Firstly you need to work out what colour yarns to work with. I chose white and navy blue basically because they were the same colours as the chart in the practise swatch document, easier to work from the chart that way. So 2 yarns, ideally one a white or light colour and the other a blue or dark colour. I have my yarn a (the background) as white and yarn b blue. Next cast on the number of stitches, the pattern repeat is 11 stitches and then you need the 2 selvedge stitches. So that’s 24 , 35, 46, 57, 68 etc stitches. I suggest 35 so you do 3 pattern repeats, enough to get a feel for the pattern AND if you want to turn this into a square you can do by just knitting more rows. So cast on the stitches in your background yarn a colour and knit 2 rows.
Then row 3, this is the interesting bit. Change to using yarn b and knit across the row , slipping stitches purlwise as you go along. The stitch you knit at the start and end of the row anchor that yarn in to the fabric. You need to make sure that the yarn goes BEHIND the stitches that are slipped. So the strands sit on the wrong side of the work.
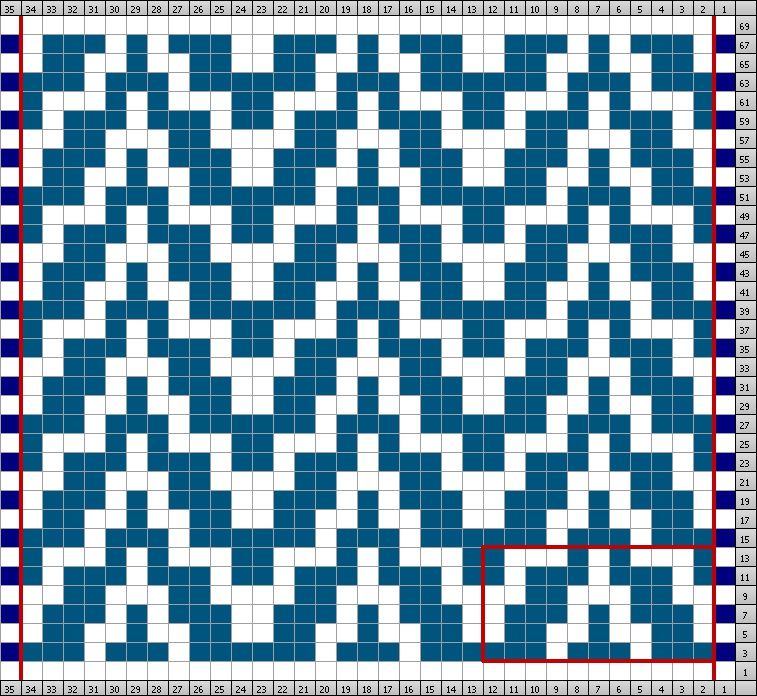
If you are working from the chart you will see there is no row 4!! But you will see that there is a row 3 and row 5. Well that’s because row 4 is exactly like row 3 where you knit the stitches that have already been knitted and slip the stitches that have been slipped. Again slip purlwise and keep your yarn strands at THIS side of the work (this will involve you actually moving the yarn across from the other side).
Row 5, change back to yarn a (in my case white) and knit across , skipping the stitches that need slipping and end with a knit 1. Make sure the strands are along the BACK of the work. Row 6, as row 5, but now make sure the strands are FACING you.
Row 7, in yarn b (navy blue in my case) k1, then work across slipping the stitches as you go. Strands to the BACK of the work. Row 8, again like row 7, strands this time AT YOUR SIDE. Take a look at the wrong side, does it look fairly neat?
I've finally got to the end of my little pattern (Row 14 done on the top photo). I decided to carry on to make a border pattern by repeating rows 3 and 4 .

To work a border.
Work as above , casting on in multiples of 11 +2 selvedge stitches.
- Rows 15 & 16 Work as Rows 3 & 4.
- Rows 17 & 18 Work as Rows 1 & 2.
To work a square
Work as above, casting on 35 stitches
- Repeat rows 3 - 14 five times
- Work rows 3 - 8
- Rows 69 & 70 Work as Rows 1 & 2.
Working from charts -
This is my preferred method. Working from right to left for RS rows (slipping with yarn at back) and then working the same row from left to right for the next WS Row (Slipping with yarn at front). I don’t bother reading the chart for the WS Row and just follow the knitting I’ve done on the previous row , knitting the knits and slipping the sts already been slipped.


